
>

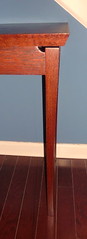
I just finished my drafting/desk and finally brought it into the house this evening. This was a great project to make and there were two new techniques I used on this project, so I learned a lot. As part of the design for this desk I decided that I wanted a slight taper and curve to the legs and I wanted a deep red Mahogany color.
After making a template for the legs I contemplated how to cut each leg out, the fastest way would have been to either use a flush trim bit with a router against my template or just freehand with a band saw. However, with only 1/2” difference from the top of the leg to the bottom and a 3/8” arch for the curve, I decided to just mark each leg and use my block plane. I had just purchased a new block plane and was looking forward to trying it out, cutting the legs out was a great opportunity for me to spend some time seeing how I liked the plane. The block plane I purchased was the Stanley Sweetheart number 9 1/2 block plane, I have been a little reluctant about these planes as I tend to lean towards the Veritas or Lie Nielsen but decided to give it a try and was very pleased with how the plane handled. The blade is pretty heavy and the plane has an adjustable mouth although it does not adjust as close to the blade as I would like. At any rate the plane handled well and I really enjoyed cutting out the legs by hand. There is just something that is very peaceful about working by hand.
The rest of the installation was pretty typical with mortis and tendon connections for the legs and rails. But the finish was a little different that I am accustomed to. I decided that I wanted the desk a deep Mahogany red but could not find a stain that gave me the color I wanted. I tend to like woods fairly natural but with the location this piece was going we didn’t want it to blend in with the area. I have never worked with dyes and decided to give it a try. After some experimenting with different colors the combination of a Mahogany water based dye and Minwax Special Walnut oil based stain gave the color I wanted. I typically always preraise the grain especially in oak and ended up with a great color when ready to apply the hand rubbed poly finish. After four coats I am very pleased with the finish.
If anyone has followed my progress on this table you will know that another element that I incorporated into the desk was to be able to tilt the desk up to use as a small drawing/drafting table. I made the arm to hold the top from wood using the basic design of a lawn chair with adjustable back. I have everything in place but am waiting on a hinge that I order to come in to secure the front. As soon as I get this I will take more pictures of the final design.
After bring the table into the house my wife said it looked great but asked what chair I was going to use with the desk……so that brings me off to the next project!

>Hi Rock,I looked at the poll above and didn't see TV as a choice so I choose Internet. Didn't see the whole build of the desk but, what I can see looks nice. Is there a link I'm missing?Outputter@Lumberjocks.com(In case I win the drawing)PS – I don't understand the choices for an identity. Is there a place to learn about that?
>Thanks for the comment! If you go to the bottom of the page you will see "Older Post" button that will take you back to previous pages or you can search the blog archives in the side bar. As for the identity if you have a google account or several other listed you can just sign in or you can just click on the "Name/URL tab to just type in your name. Again thanks for the comment and come back often, I normally post every few days and plan on starting a new section just for tool reviews.Thanks,Chris
>High again Rock,I did find the link to older posts and was able to sort out the desk build. I want you to immediately drop what you're doing and make a link that will gather all the posts of a project together. lolI know how hard this web stuff can be. Just letting you know my thoughts. Making things easy on the visitors is really one of the main ingredients to getting them to follow you. I'd also add a lot more pictures so I can see the legs you finished, etc.Best of luck to you. I will continue to check in occasionally.
>Tried to post using just the "Name" option and it ate my comment.OutPutter
>It didn't eat my comment after all. I just couldn't see it. lol
>Thanks for the great feedback! One of the biggest reason I want people to comment is for me to know how to improve the site. I did redo the lable section yesterday and made it "site pages" in this area you can click on article, podcast, projects, tool reviews, esc… to get to pages with just those post in them… it is a lot better but still working on it.
>As for more pictures of the table legs. I do plan on making a seperate page just for project photes and would like to get readers project photos as well… so if you have something send it to me and I will post them. I am working on a video now that I should have in a week or so demonstating how I made the legs, so check back in.